|
|
|
Now lets make some Avatars for Virtual Places. Lets say that you found a really nice picture you like and you want it as an avatar. I found this on while cruising web pages.
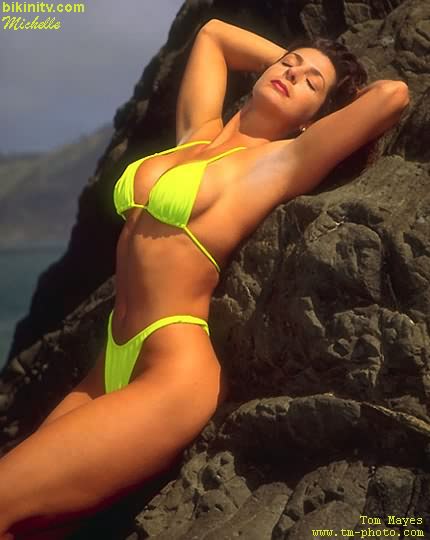
Now this picture is really too large to make into an avatar. I used this as an example so you could see just what is possible. In a future tutorial i will explain how i got rid of the lettering. The first thing that i did after dealing with the lettering was to expand the height by 36 pixels. Why 36 pixels? Because that is the amount necessary so that when i resize it to 48 pixels wide and 64 pixels high it does not loose its proportions. If you look close at the small picture you will see that i added this at the bottom.
First i made a blank image the same width but 36 pixels higher than the michelle picture, then transfered the michelle pic over to it. Do this by highlighting the michelle picture, then go up and click "Edit/Copy" (shortcut is "ctrl+a" then "ctrl+c"). Then highlight the blank image, and go up and click "Edit/Paste" (shortcut is "ctrl+l"). Then using the mouse, Click in the center of the picture, hold the click, and position michelle at the top of the blank.
When I say highlight an Image all I mean is to click on the titlebar of the Image or picture.Now to fill in the bottom, click on the selection tool, making sure it is set for rectangle, and starting at the bottom of the michelle part of the picture at the left side make a rectangle high enough to cover the letters you want covered and the whole width of the picture. You will have a dotted moving line of the rectangle. Hold the ALT key down and left click in the center of the rectangle and drag it down to its new position covering the blank area of the pic. right click to lock it into place. Then use the brush tool, set to black, to cover where her leg looks out of shape.
Now, reduce the picture in size, for an avatar. In "Image" click on "resize", put a check mark in the "maintain aspect ratio " box and click a dot in pixel size. then type in 48 in the width box, the height should set itself to 64. The picture will be a little blurry so give it a single sharpen. Then save it as a "gif " in your V Places/Gallery folder and you have a new Av.
Heres what you end up with.
Not a great picture since it was so large to begin with but a nice picture neverless. Nice clear smaller pictures on the internet will give you much much clearer and nicer Av's.
Want to put your name on it? Easy, while the pic was big, make your name with a font you like on a transparent blank image. Use any changes you want on the name, like filters or even standard psp tools. Make the name big enough to cover the area you want and make it big enough to see when the av is reduced in size. Do the "Edit/Copy" (shortcut is "ctrl+a" then "ctrl+c"), and "Edit/Paste" (shortcut is "ctrl+l") to add the name to the pic, then reduce the size. I just added an Initial to the pic because i reduced its size before i thought of putting a name on it.
Want to put the name on an Avatar thats already a "gif" and doesnt want to work ? Just click "colors", then "increase color depth" to 16 million colors. Now the name will appear on it. Save the pic with a different name or a number added to the name if you still want the av without a name on it.
Have some fun making your own Avatars now.
to the Avatar Layers Page
back to Adjusting and Sizing Pictures
back to PSP Basics Page